Sunday, April 12, 2020

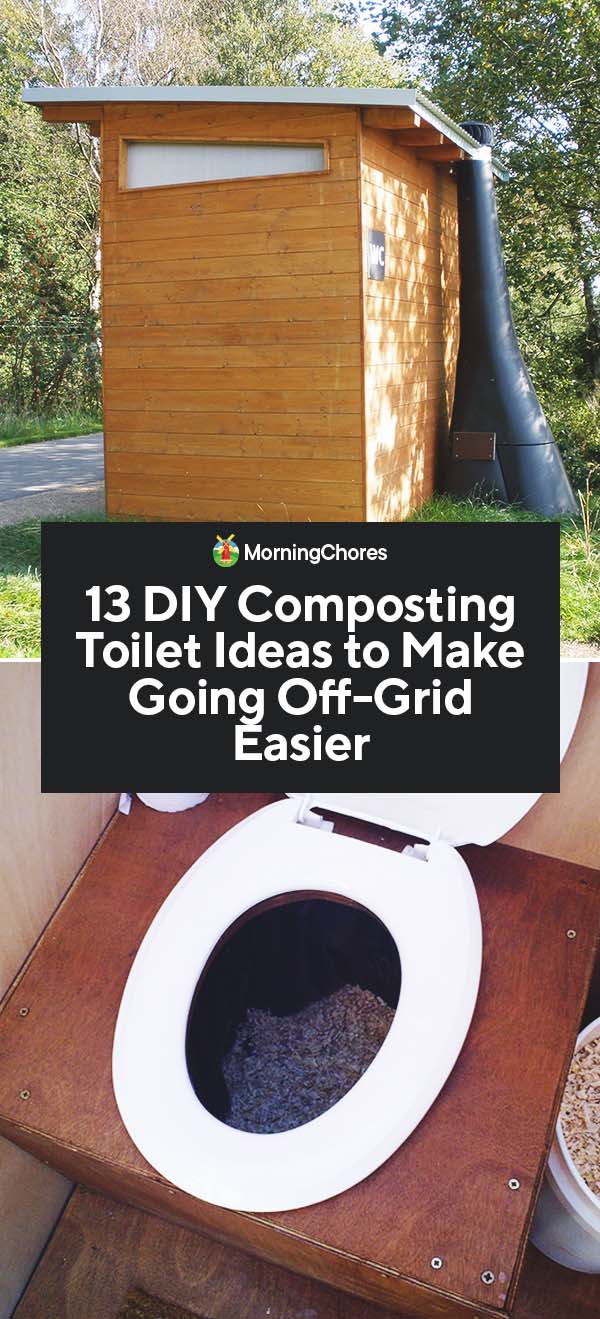
13 DIY Composting Toilet Ideas to Make Going Off-Grid Easier

By Jennifer Poindexter

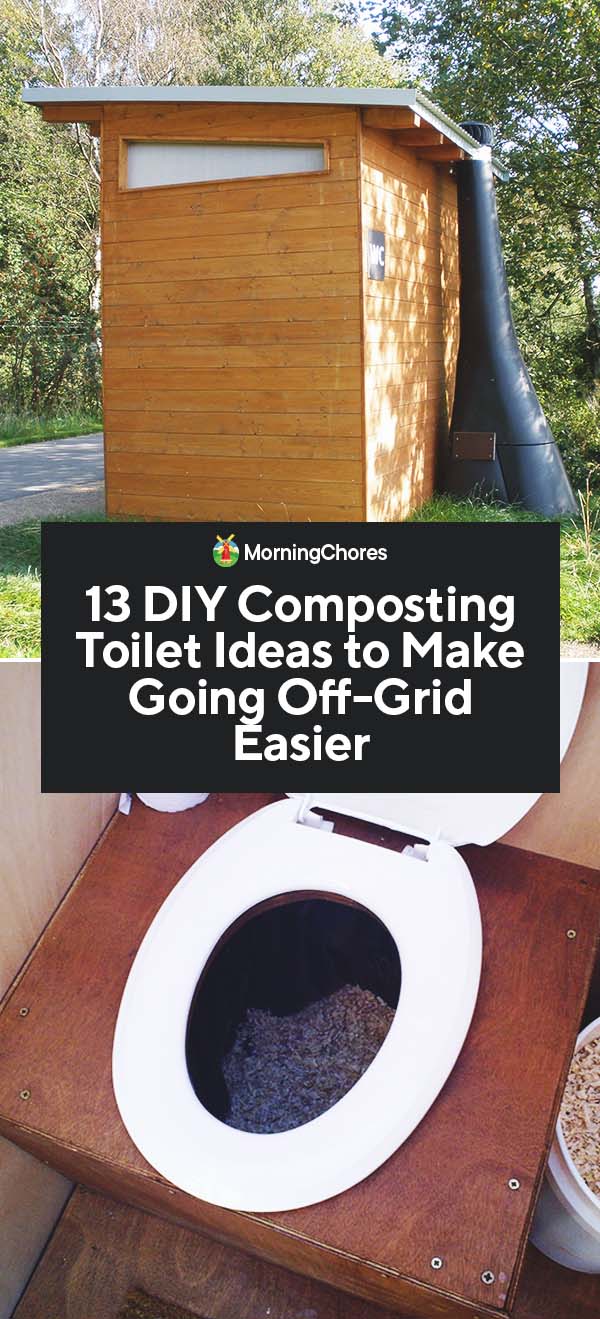
Are you considering heading off-grid? Do you know how you’re going to handle life without electricity or running water?


Perhaps one of your biggest concerns is your bathroom. Whether you have a bathroom inside your off-grid home, or you decide on an outhouse, you will still need some ideas for a composting toilet.


Which is exactly what I’m bringing you. I’ve hunted high and low across the internet to find some of the best plans for you to browse through and decide which composting toilet will work well for you.


Here are some of the DIY options for the perfect composting toilet for your off-grid home:

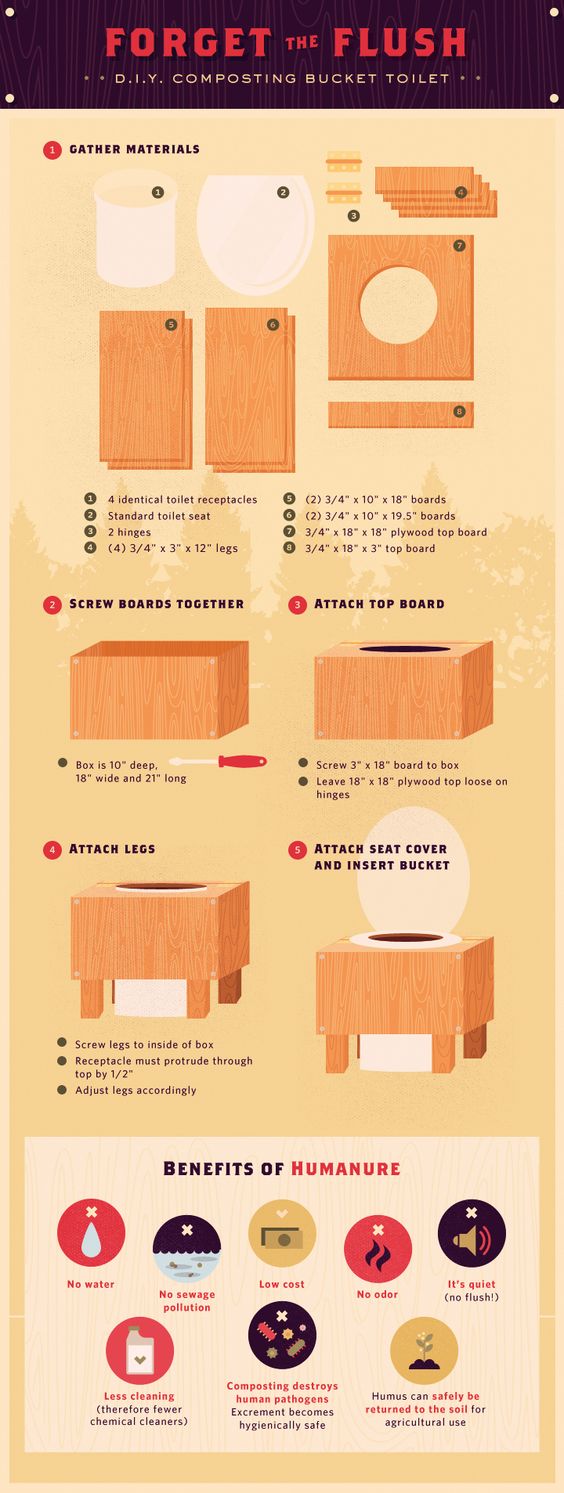
1. THE YURT 411

T

Thisfirst option for a composting toilet comes from a person who has lived in a yurt off-grid for approximately 15 years.


He shares with you how to make a DIY compost toilet work for you, and the benefits it can have if you choose a homesteading lifestyle.


2. COMPOSTING TOILET FOR A TINY HOUSE
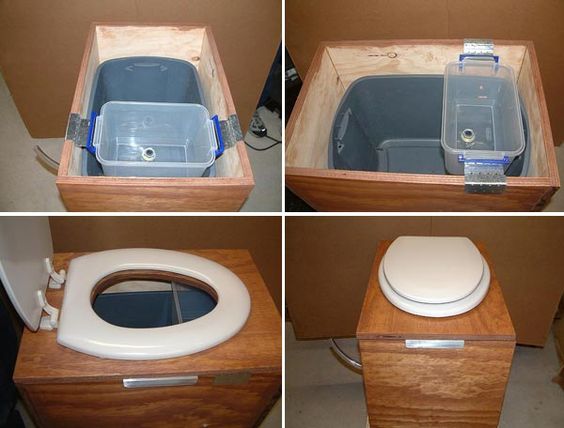

This composting toilet idea comes from a tiny house blog. It looks to be an inexpensive option for a composting toilet.


But it’s created with a rubber tub in the bottom. There’s a smaller plastic tub which is meant to separate the urine from the excrement. It’s wrapped up in a nice little wooden box package to make the toilet look a little nicer in your tiny bathroom.


3. THE BASIC DIY COMPOSTING TOILET
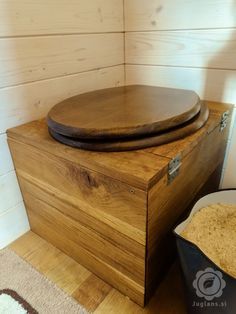

This composting toilet idea is only a picture. Yet, you can see from the picture how the design is meant to work.


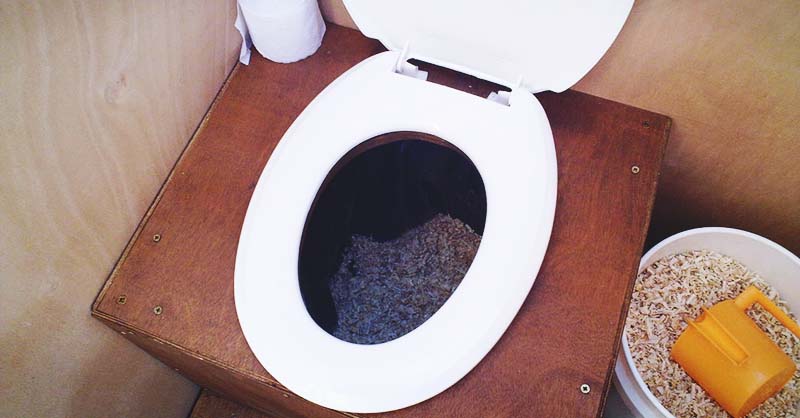
There’s a wooden box with a toilet seat. It isn’t clear if the waste is divided out or if it’s left together. You can also see the sawdust in a bucket next to the toilet to dump over the waste when you’re finished using the toilet.


4. THE COMBINATION
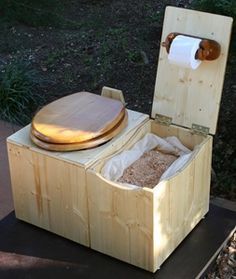

This toilet is a neat idea when creating your DIY composting toilet. From the look of the website, you can order the toilet to be made by someone else.


In our case, I wanted to share it for inspiration because it’s a large wooden box with the toilet in one section, and the other section holds sawdust and the toilet paper.


5. THE TRADITION COMPOSTING TOILET
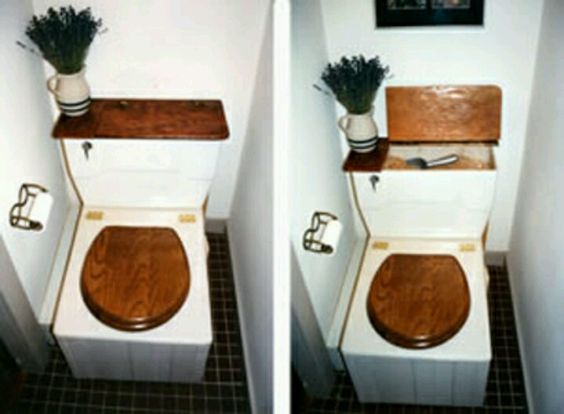

Would you like to have a composting toilet which looks similar to a standard toilet? This idea may be what you’re searching for.


The toilet is held in a wooden box. The back of the toilet is where the sawdust is held for easy access when needed.


6. THE COMPOSTING TOILET DIY SYSTEM
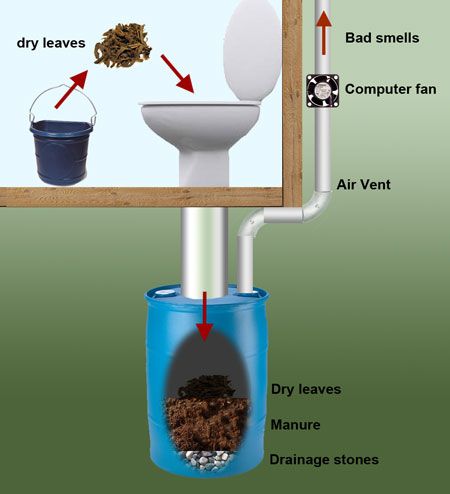

Do you have a means for converting an old toilet into a composting toilet, but you need the methods to create a system for it?


Well, you’ll love this idea. The toilet sits over a large barrel which has piping to disperse the bad smells but is also filled with materials to help the waste compost.


7. URINE SEPARATING COMPOSTING TOILET BUCKET
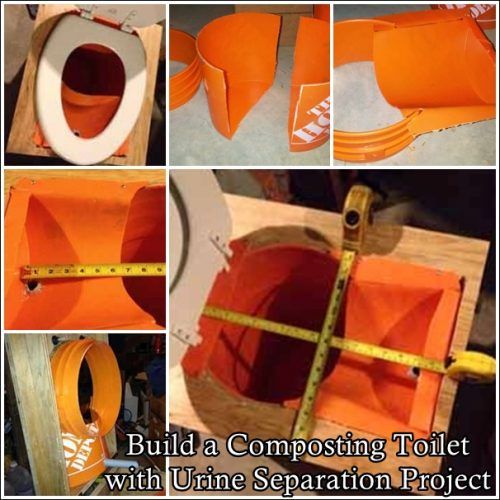

Are you working on a budget, but you still want to have a composting toilet which will separate urine from other waste?


Check out this idea. It’s created using a five-gallon bucket which will be cut in a way to separate all the waste for further use.


8. RV COMPOSTING TOILET


Some off-gridders don’t move to a yurt or tiny home. Some choose to live in an RV for a while until they can pay for their land and build something more permanent.


In the meantime, they still need a composting toilet solution. This idea utilizes an olive barrel to form a great solution which works perfectly for these RV dwellers.


9. THE IN-DEPTH COMPOSTING TOILET
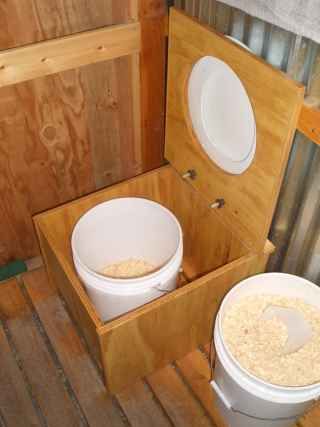

Are you new to the idea of a composting toilet? You want to build it yourself because purchasing a composting toilet can be expensive, but you aren’t exactly sure where to start or what you’re getting into?


Well, you must check out this post. They show you how to build a simple DIY composting toilet, but also give you a great deal of background information to help you understand how the process works best.


10. THE FIVE-GALLON COMPOSTING TOILET


Are you less interested in the aesthetics of the toilet and more about the function of a DIY composting toilet?


If simplicity is key for you, you’ll love this idea. They run a pipe to separate the urine from the waste and place a toilet lid over a five-gallon bucket. It’s easy, inexpensive, and according to the creators, it works well.


11. THE DIY SMALL SEPTIC SYSTEM


N

Noteveryone is into a composting toilet. If this is you, yet you still want to be off-grid on a budget, consider creating a small septic system.


This tutorial walks you through how to build a small septic system yourself. It isn’t as simple as a composting toilet, but in some cases, it may be the best option.


12. THE FANCY COMPOSTING TOILET


Do you have an old corner cabinet you’d like to put to use, but you aren’t sure how to go about it, consider using it for a DIY composting toilet.


This tutorial walks you through each of the steps, but you’ll place the bucket to catch waste inside the cabinet. From there, cut a hole in the top and add a toilet seat. It looks good and also allows you to upcycle items too.


13. THE VERMICOMPOSTING FLUSH TOILET DIY COMPOSTING TOILET


Thiscomposting toilet requires a little more ingenuity than some of the other options listed above. However, it enables you to have a flushing toilet.


At the same time, you have a worm bin for compost and for feeding your garden too. If you’re looking for a more advanced DIY system, consider checking out this option.


Well, you now have 13 different options for a DIY composting toilet system. This is a big decision when deciding to move off-grid.


Unfortunately, if you don’t choose the best fit, the situation can become smelly, quickly. Besides, a toilet is something we all need and would like to be as comfortable about as possible.


Consider your building skills, budget, and which toilet would be the most feasible in the amount of space you have. By taking your time and doing research, you’ll hopefully find the best fit for your situation.

S

Source https://morningchores.com/diy-composting-toilet/ 
Tuesday, April 7, 2020

Who Needs Pesticides When You Can Companion Plant?

https://www.unsustainablemagazine.com/who-needs-pesticides-when-you-can-companion-plant/

WHAT IS COMPANION PLANTING?


Do you have a companion in your life right now? I know I do. If you do, what was it about them that made you choose them? Was it their caring and understanding nature? Was it that they were a little different and complemented you perfectly? Or was it the colour of their eyes you simply couldn’t resist? We’re very lucky that we can choose our own companions, plants, on the other hand, don’t have it so good.


In our gardens, in particular, they get PLONKED in the ground wherever we see fit. I’m A PRIME EXAMPLE of people planting something just because there was A SPACE. Until now, I’VE GIVEN LITTLE THOUGHT to soil conditions, the availability of light, colour combinations, and whether plants can be beneficial partners. This year, that’s about to change and I’m starting with companion planting. 


Companion planting is a way of maximising growth and CROPS by planting mutually beneficial plants next to each other. 


WHAT ARE THE BENEFITS OF COMPANION PLANTING?


There are many reasons to start companion planting:


✓ Pest prevention: A companion plant might protect its partner from pests that are typically attracted to it.

Improved soil fertility: NITROGEN-FIXING PLANTS can help our non-nitrogen fixing plants.

✓ A natural TRELLIS: tall plants can help provide SCAFFOLDING for climbing plants.

✓ Regulating shade: low shade-loving plants can get protection from tall sun-loving plants.

✓ Weed control: you can DISCOURAGE WEEDS FROM GROWING AROUND UPRIGHT, thin plants by planting wide ground-covering plants.


THREE SISTERS PLANTING


Almost every article I read online mentioned something called three sisters planting. It’s an example of companion planting that the Native American’s have been practising for centuries. The three sisters in question are sweetcorn, CLIMBING BEANS, and squash or pumpkin. Several Native American tribes used this planting trio because they THRIVED EXCEEDINGLY WELL together.


They plant the corn first and as the older sister it offers support for the beans. The beans pull nitrogen from the air and bring it to the soil for the benefit of all the sisters. As they grow the beans WIND THEIR WAY up the CORN STALKS and hold the sisters together. The large pumpkin leaves protect the roots of the sisters by creating a living mulch to shade the soil. The leaves help to keep the soil cool and moist while also preventing weeds.      


Some Companion Planting Suggestions

The list of companion planting suggestions is as long as your arm. THERE’S NOT ENOUGH ROOM here to include them all so let’s look at some common garden plants and possible companions.


TOMATOES


Basil and tomatoes is a match made in heaven, not just in the kitchen but in the garden too. This pungent herb not only repels flies and mosquitoes, it also improves the tomatoes YIELD. Another great companion for tomatoes are marigolds. They repel several garden pests including NEMATODES. Other companions for tomatoes include:


Asparagus

Carrots

Celery

Lettuce

Parsley

Spinach

Members of the onion family 


Cabbage, beets, FENNEL, DILL, peas, and rosemary are not good bedfellows for tomatoes. Potatoes and corn should also be grown far away from your tomatoes. 


PEAS


Good neighbours for peas are beans, carrots, cucumbers, corn, radishes, and TURNIPS. Chives are also a good companion because they ward off APHIDs. If you want to improve the flavour and health of your peas, consider planting mint nearby. 


For a natural trellis for your peas, plant corn or sunflowers. 


PEPPERS


A good companion for peppers is basil. It helps to repel aphids, mosquitoes, flies, and SPIDER MITES. There’s also A SCHOOL OF THOUGHT that thinks basil improves the flavour of the peppers. Might have to do some A/B testing of my own to see whether there’s any truth in that statement. Onions, tomatoes, and spinach also make good companions for peppers.


Keep peppers away from beans to avoid the bean vines getting TANGLED in the pepper plants.


GREEN BEANS


If you don’t want to go to the bother of building a trellis for your beans plant them in amongst corn. The beans also help out the corn by fixing nitrogen in the soil. To help keep the pests away from your beans you can plant marigolds, nasturtiums, summer savory, and rosemary. These flowers and herbs repel bean beetles. 


Other companions include:


Brussel sprouts

Broccoli

Other members of the cabbage family

Cucumbers

Peas

Potatoes

Radishes


Beans don’t like to grow alongside beets or members of the onion family.


CUCUMBERS


Good companion plants for cucumbers include:


Beans

Celery

Corn

Dill

Lettuce

Peas

Radishes

Plant marigolds and nasturtiums to repel aphids and beetles.


One plant you should not plant near your cucumbers is sage. It can stunt the growth of the cucumbers. 


ONIONS


Plant carrots near onions because the onions will repel carrot fly. Onions are also a very effective aphid DETERRENT, which makes them perfect for planting alongside plants that are prone to aphid INFESTATIONS. Cabbage, lettuce, parsnips, tomatoes and beets are also good companions for onions. Rosemary, marjoram, and SAVORy are good herbs to grow alongside. 


Keep your onions away from peas, beans, and asparagus.   


LETTUCE


A common problem if you grow lettuce, particularly in the UK, has to be SLUGS. Thankfully slugs aren’t a problem here in Bulgaria. It’s not wet enough and probably too hot. Nevertheless, I like the idea of planting mint among the lettuce, together with CHIVES and garlic to repel aphids. Other good companion plants include:


Beets

Beans

Broccoli

Corn

Carrots

Radishes

Peas 

And let’s not forget the veg gardeners favourite flower the marigold. 


It doesn’t seem like lettuce has many plants it doesn’t get along with apart from parsley, and that’s only because it might have a tendency to CROWD the lettuce OUT. 


CARROTS


Carrots don’t like the heat which for me means growing them in the spring and autumn. I didn’t realise, until doing my research, that they can grow well when PLANTED IN among tomatoes. It not only provides much needed shade, it also produces a natural insecticide called solanine. This natural insecticide targets pests that are a problem for carrot plants. 


The relationship between tomatoes and carrots is not one-sided. The tomatoes benefit from the carrots because they aerate the soil around the roots of the tomato, letting more air and water reach the roots. 


LEEKS also make good companions for carrots, together with rosemary, SAGE, and chives. 


RADISHES


I love growing radishes because you get a crop within 30 days. None of that waiting around for months and having to LAVISH it with loads of attention. I like the idea of planting them among carrots. You harvest them before the carrots, so they loosen the soil for the carrots just as they’re about to take off. Radishes also have several other friends such as:


Onions

Beets

Cabbage

Lettuce

Spinach

Kale

Squash 


The only plant radishes don’t get along with is HYSSOP. 


SWEETCORN 


A favourite BEDFELLOw for sweetcorn is something that fixes nitrogen in the soil. Hence the reason beans make such good companions. Sweetcorn also makes a great natural trellis for cucumbers, peas, pumpkins, and melons. Courgettes also grow well planted among sweetcorn. 


Tomatoes and corn shouldn’t be planted close together because corn earworms can attack both of them. 


COMPANION PLANTING HERBS


I’ve become a big fan of herbal teas in recent years, after ditching caffeine, but hadn’t thought of growing them in amongst my vegetables. I will try a few of the following suggestions this year.


Rosemary: Deters bean BEETLES, CABBAGE MOTHS, and carrot flies.

Parsley: Plant near asparagus, corn, and tomatoes.

Oregano: Good to plant amongst all vegetables.

Mint: Deters white cabbage moths.

Chives: Good to plant with carrots.

Basil:  repel flies and mosquitoes from your tomato plants. 


If you want to know more about companion planting, there’s a fantastic list on The Old Farmer’s Almanac website.


I, for one, will be putting some of these companion suggestions into practise this year. We’ve got an aim here in Bulgaria for the coming year. To grow everything we need to eat (fruit and vegetable WISE) in our garden. It will be a lot of hard work but it will be worth it. I hope you’ve enjoyed reading this article, and it inspires you to get out there and get your hands dirty. Even if you’ve just got a small patio, there are plenty of opportunities for growing some of your own food. 


Source: https://www.unsustainablemagazine.com/who-needs-pesticides-when-you-can-companion-plant/ 

posted from Bloggeroid

Saturday, April 4, 2020

THE TINY LIFE

https://thetinylife.com/what-is-the-tiny-house-movement/

THE TINY LIFE

WHAT IS THE TINY HOUSE MOVEMENT?

What are tiny houses? What is the tiny house movement? Why do people choose tiny homes and what does tiny living mean?

Simply put, the trend toward tiny houses has become a social movement. People are choosing to DOWNSIZE the space they live in, simplify, and live with less. People are embracing the tiny life philosophy and the freedom that accompanies the tiny house lifestyle. The tiny house movement is about more than simply living in a small space (although, a small house is certainly part of it).

HOW BIG IS THE AVERAGE TINY HOUSE?

What is a tiny house? How big (or small, rather) is a tiny house anyway? Well, the typical American home is around 2,600 square feet, whereas the typical small or tiny house definition is a home with square footage is between 100 and 400 square feet. While of course there aren’t any rules to joining the tiny house movement, when people refer to “the tiny life,” their tiny house generally falls under the 400 square foot level.

Tiny homes may be rented or owned. You may choose a mini home on wheels or your small home may set on a foundation. Most tiny houses are independent structures—some are parked on land with other buildings or a larger home. Other tiny houses are parked on their own lot. Some tiny houses are designed and built by the owner themselves, while others are PURCHASED, adapted from TRAILERS, or built from a tiny house kit. Tiny houses come in all shapes, sizes, and forms, but they all enable simpler living in a smaller, more efficient space.

WHY JOIN THE TINY HOUSE MOVEMENT?

To those who haven’t tried tiny house living, it may seem DAUNTING. Why would someone choose to live in a small space? But “bigger is better,” right?

IT TURNS OUT there are many MERITS to the tiny home movement and the tiny life philosophy. Of course, people may join the movement for any number of reasons, but the most popular reasons include environmental concerns, financial concerns, and the desire for more time and freedom.

The tiny life provides huge financial advantages and the ability to live a lifestyle filled with adventure. For most Americans, 1/3 to 1/2 of their income is dedicated to the roof over their heads! That means many people will spend a lot of time figuring out how to afford their homes. Buying a house often translates to at least 15 years of working over your lifetime to pay for it. Because of the high cost of owning a “typical-sized” home, as well as THE ASSOCIATED EXPENSES (and CULTURE OF “BUY NOW, PAY LATER”), 76% of Americans are LIVING PAYCHECK TO PAYCHECK.

We work hard to afford bigger houses than we need. We continue to work, so we can fill our houses with more stuff…items we may not need but buy anyway. Many Americans are OVERWHELMED BY THEIR PACKED SCHEDULES AND OBLIGATIONS. They’re TIRED OF RUNNING IN THE RAT RACE.

So, what’s the alternative to this high cost of living? One solution is to LIVE SMALLER—and it’s that realization that brings many people into the tiny house movement. While small homes aren’t for everyone, tiny house costs are much lower than a full-size building.

In my own journey, I started out in an apartment that cost me $1000 per month once you added in utilities, insurance, etc.  Once I moved into my tiny house, my bills virtually disappeared, it now costs me $15 (yes you read that right, fifteen dollars!) per month.  The cost of building my own tiny house was RECOUPED in under 2 years’ time, allowing me to bank a lot of savings. Even if you’re not ready to TAKE THE PLUNGE, there are lessons to learn and apply to escape the cycle of debt in which almost 70% of Americans are trapped.

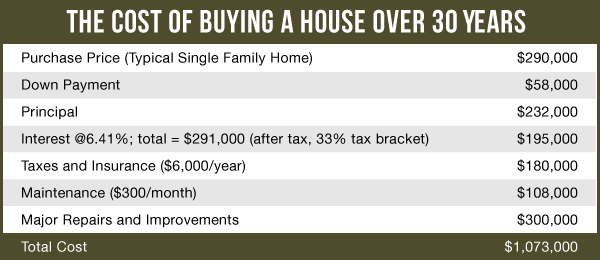
The cost of buying an average-sized house over 30 years can be much higher than you think. The initial cost of a $290,000 home includes THE PURCHASE PRICE, of course, but also includes the interest, taxes, insurance, maintenance, repairs and improvements. All of this can add up to a total cost of over a million dollars during the lifetime of your home.  This is the “true cost” of a home.

This chart shows the real cost of buying a house. These numbers show why the tiny house movement is growing with such popularity. 


Why is the tiny home trend becoming so popular? Because the average cost of a tiny home is much lower than that of an average house. Once you’ve purchased your tiny home (current tiny house market trends show tiny houses cost between $10,000 and $40,000), the cost of UPKEEP is relatively low. Depending on where you park your tiny house, you may need to pay for land rental and insurance, but in the long run, the savings on a tiny house is huge.

THE SMALL LIVING MOVEMENT AND THE JOY OF LIVING WITH LESS

As you see, it’s no wonder many people are overwhelmed by the cost of their homes.

The tiny life is a growing movement, for sure! With international attention on CNN, AP, Guardian, Huffington Post, NBC, Oprah, PBS, and so many more (find links at the end of this page), the tiny house movement has helped people learn about another way to live their lives. Every month thousands and thousands of readers come to my site hoping to learn how they too, can simplify, DOWNSIZE, and learn how to live with less. I know many other tiny house owners who blog about their experience, and they report the same trend toward the small living movement.

My website focuses on tiny house living or living The Tiny Life. It’s where I like to share my journey. Since I began, I’ve been able to experience many adventures, travel to new places, and enjoy my freedom.

Tiny houses are the FOCAL POINT in a broader system to address issues, concerns, and problems of the current day. They offer a path to a smaller ENVIRONMENTAL FOOTPRINT, greater financial freedom, and ultimately a self-sufficient life. The tiny home movement enables you to LIVE A LIFE ON YOUR OWN TERMS.

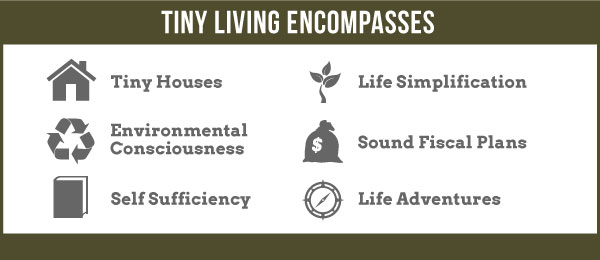
So if you wonder who buys tiny houses? Anyone who is concerned about life simplification, environmental consciousness, self-sufficiency and sound FISCAL plans. The tiny life allows for you to have more time and freedom to enjoy life adventures.

Tiny living encompasses: tiny houses, life simplification, environmental consciousness, self sufficiency, sound fiscal plans and life adventures 


WHAT TINY HOUSE LIVING LOOKS LIKE

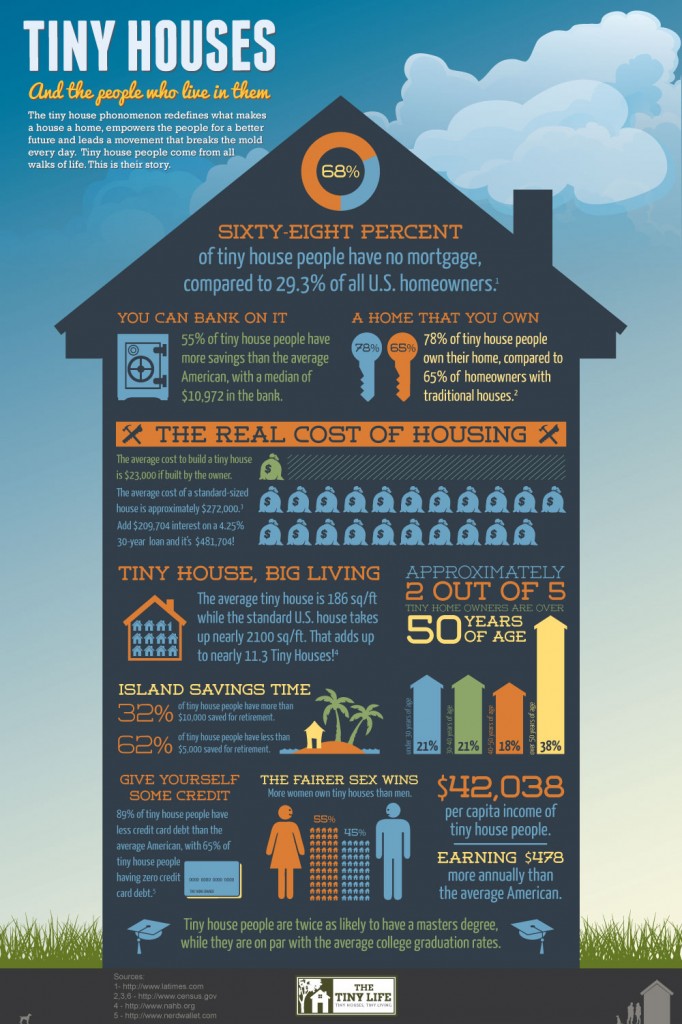
Because the tiny life is lived on your own terms, it looks a little different for everyone. There are definitely COMMONALITIES amongst tiny house owners, though. There are also impressive savings many members of the tiny house movement experience. Here’s a great INFOGRAPHIC to illustrate all the important tiny house statistics and tiny living by the numbers. Wondering what is a tiny home? This will help paint the picture.

S


Someof the tiny house info above may surprise you. 68% of tiny home owners have no mortgage (compared to 29.3% of all U.S. homeowners). It’s no surprise then, that more tiny home owners (78%) own their own home—plus, 55% of tiny home owners have more savings than the average American. 32% of tiny home owners have more than $10,000 TUCKED AWAY for retirement.


A tiny home is easier to maintain because the average tiny home size is significantly smaller. Imagine the time you’ll save keeping up with the average tiny home square footage (just 186 square feethe THE AVERAGE “REGULAR-SIZED” HOME in the U.S. is over 11 times larger! That’s much more time spent on upkeep.


Who buys tiny houses? More women than men (55% compared to 45%). Tiny house people are twice as likely to hold a Master’s degree and ARE ON PAR WITH the average college graduation rates. 2 out of 5 tiny house owners are over 50. The average income is $42,038, which means that on average, tiny house owners are earning $478 more annually.


2nd part


WHY A TINY HOUSE? TINY HOME OWNERS IN THEIR OWN WORDS


THERE’S NO BETTER ADVOCATE FOR the tiny life movement than those who are living the tiny life themselves.


Below I’ve COMPILED a few tiny house videos explaining exactly why so many people choose to embrace the tiny house movement. These owners of tiny homes share the benefits they’ve seen from making the switch to a simpler lifestyle. Even if you don’t own a tiny home, PER SE, there are plenty of truths you can apply to start living the life of your dreams.


THE TINY LIFE: TINY HOUSES, SIMPLE LIVING


Video: https://youtu.be/4gj0UZsY1iA 


What is the tiny house movement all about? Here are many different perspectives from tiny home owners about why they chose to follow the small house trend. Simplifying, freedom, sustainability—the tiny house movement is about finding housing to fit your lifestyle. It’s about not only DECLUTTERING your home and space, but decluttering your obligations, your social life, and your stress. The tiny life is about financial freedom and living a more engaged life with the luxury of time to do what YOU want.


Special thanks to Dee Williams, Lina Menard, Macy Miller, Laura LaVoie, & Chris and Malissa Tack.


HOW TO START DESIGNING A TINY HOUSE


Video: https://youtu.be/rXhXdNd5Gbs 


Thinking of joining the mini house movement, but don’t know where to begin? Here’s how to start designing a tiny home, including the steps you should take before you decide to buy. Gather as much tiny house information as you can before you TAKE THE PLUNGE. Before you start finding tiny homes to live in, spend time in tiny homes, talk to other tiny home owners, and even consider renting a tiny home or apartment. Once you’re ready, learn how to use design and PACKING STRATEGIES to your advantage to make the most of your small space!


Special thanks to Lina Menard.


THE NEXT STEP IN THE TINY LIFE


Video: https://youtu.be/fcpxJzuIdT0 


What happens after you move into a tiny house? So much is said about purchasing tiny house plans and learning how to build a tiny house. But once all the logistics are in place, what happens after you move in and start living the life you’ve always wanted? It brings up interesting questions to explore: with financial freedom and a simplified life, what are you going to do? Now that you have time, where will you set out for your next adventure? I made this video explaining how I faced this question and what I discovered about life after you join the small house movement.


LEARN MORE ABOUT THE TINY HOUSE MOVEMENT


Since The Tiny Life began, we’ve been featured many times discussing the tiny house movement and what it means to live the tiny life. Here are more places you can go to read about the small home movement and lifestyle:


  1. Tiny House Living: Ideas for living well in 400 square feet or less – The best selling tiny house book

  2. What is the Tiny House Movement – Plans, Resources, Pros & Cons from Money Crashers

  3. What is the Tiny House Movement from Neighbor, Inc.

  4. Why Hasn’t the Tiny House Movement Become a Big Thing: A Look at 5 Big Barriers from TreeHugger

  5. What is a Tiny House from Living Big in a Tiny House

  6. Factors to Consider Before Joining the Tiny House Movement from U.S. News & World Report

  7. Tiny Homes Offer Convenience, Affordability to Owners from CNBC

  8. This Tiny Life: Ditch the Square Feet, Gain the World from Creative Loafing Charlotte


  1. Get The Tiny Life Newsletter..


Source:

https://thetinylife.com/what-is-the-tiny-house-movement/ 


posted from Bloggeroid

Friday, April 3, 2020

Trees talk to each other

Trees talk to each other/

Like humans, trees are extremely social creatures, utterly dependent on each other for their survival. And, as it is with us, communication is key.

After scientists discovered pine tree roots could transfer carbon to other pine tree roots in a lab, ecology professor Suzanne Simard set out to figure out how they did it.

What she discovered was a vast tangled web of hair-like mushroom roots — an information super highway allowing trees to communicate important messages to other members of their species and related species, such that the forest behaves as “a single organism.”

The idea that trees could share information underground was controversial. Some of Simard’s colleagues thought she was crazy.

Having trouble finding research funding, she eventually set out to conduct the experiments herself, planting 240 birch, fir and cedar trees in a Canadian forest.

She covered the seedlings with plastic bags and filled them with various types of carbon gas.


An hour later she took the bags off, ran her Geiger counter over their leaves and heard “the most beautiful sound,” she says in the Ted Talk below:

“Crrrrr… It was the sound of Birch talking to Fir,” she said.

“Birch was saying, ‘hey, can I help you?'”

“And Fir was saying yeah, can you send me some of your carbon? Somebody threw a shade cloth over me.”

She also scanned the cedar’s leaves, and as she suspected — silence. The cedar was in its own world. It was not connected into the fungal web linking birches and firs.

The birch and fir were in a “lively two-way conversation,” Simard says

When the fir was shaded by the birch in summer, the birch sent more carbon to it. When the birch was leafless in the winter, the fir sent more carbon to it.

The two trees were totally interdependent, Simard discovered, “like yin and yang.”

That’s when Simard knew she was onto something big… In the past, we assumed trees were competing with each other for carbon, sunlight, water and nutrients. But Simard’s work showed us trees were also cooperators.

They communicate by sending mysterious chemical and hormonal signals to each other via the mycelium, to determine which trees need more carbon, nitrogen, phosphorus and carbon, and which trees have some to spare, sending the elements back and forth to each other until the entire forest is balanced.

“The web is so dense there can be hundreds of kilometers of mycelium under a single foot step,” Simard says.

The mycelium web connects mother trees with baby trees, allowing them to feed their young.

A single mother tree can provide nourishment for hundreds of smaller trees in the under-story of her branches, she says.

Mother trees even recognize their kin, sending them more mycelium and carbon annd reducing their own root size to make room for their babies.

This new understanding of tree communication had Simard worried about the implications of clear-cutting.

When mother trees are injured or dying, they send their wisdom onto the next generation. They can’t do this is if they are all wiped out at once.

“You can take out one or two hub trees, but there comes a tipping point, if you take out one too many, the whole system collapses,” she says.

Often clear-cut forests are replanted with only one or two species. “These simplified forests lack complexity making them vulnerable to infection and bugs.”

To ensure the survival of the planet’s lungs at a time when they are most crucial, Simard suggests four simple solutions to end the damage caused by clear cutting :

1. Get out in the forest more — this in and of itself will remind us how interdependent we are on this ecosystem.

2. Save old growth forests as repositories of genes, mother trees and mycelium networks.

3. Where we do cut, save the “legacy” trees so they can pass on important information to the next generation.

4. Regenerate cut patches with diverse native species

Monday, March 30, 2020

How to make a solar oven

[https://www.homesciencetools.com/article/how-to-build-a-solar-oven-project/

HOW TO MAKE A SOLAR OVEN


Use the sun's energy to heat up A TASTY TREAt with this simple solar oven! Have you ever heard the expression that it's so hot out you could fry an egg on the SIDEWALK? Have you ever wondered if it's true? Find out with this easy, fun, and delicious solar oven science project that uses only household items and a pizza box. Plus, learn about absorption , insulation, and the sun's energy.


Want even more solar energy science? Check out these solar energy science projects. And for another edible science project that teaches about insulation, make Baked Alaska.


What You Need:


  • Cardboard pizza box (the kind DELIVERED PIZZA comes in)

  • BOX KNIFE or scissors

  • Aluminum foil

  • CLEAR TAPE

  • Plastic WRAP (a HEAVY-DUTY or FREEZER ZIP LOCK BAG will also work)

  • Black CONSTRUCTION PAPER

  • Newspapers

  • Ruler or wooden spoon

  • Thermometer

  • An adult to help with cutting

  • Recipe Ideas

  • SOLAR OVEN RECIPES

  • Or buy a SUN SPOT SOLAR OVEN KIT>>


What You Do:


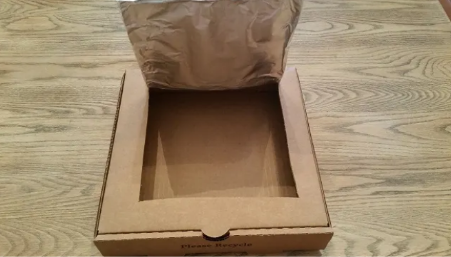
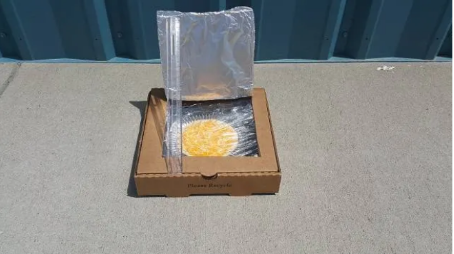
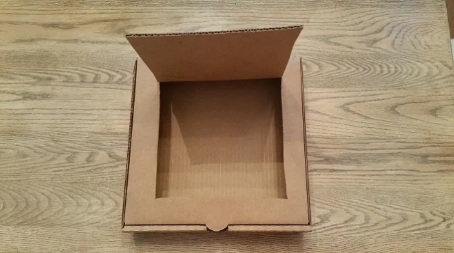
1 Use a box knife or sharp scissors to cut a FLAP in the lid of the pizza box. Cut along three sides, leaving about an INCH between the sides of the flap and the edges of the lid. Fold this flap out so that it stands up when the box lid is closed.  


2. Cover the inner side of the flap with aluminum foil so that it will reflect rays from the sun. To do this, TIGHTLY WRAP FOIL AROUND THE FLAP, then tape it to the back, or outer side of the flap.


3. Use clear plastic wrap to create an AIRTIGHT WINDOW for sunlight to enter into the box. Do this by opening the box and taping a double layer of plastic wrap over the opening you made when you cut the flap in the lid. Leave about an inch of plastic OVERLAP around the sides and TAPE each side DOWN securely, SEALING OUT AIR. If you use a plastic bag, cut out a square big enough to cover the opening, and tape one layer over the opening.


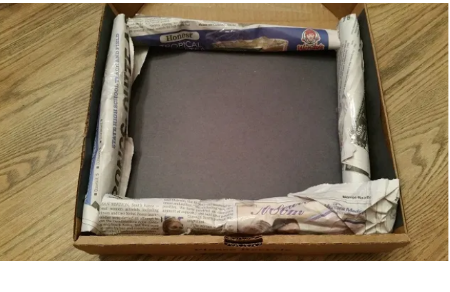
4. LINE THE BOTTOM OF THE BOX WITH black construction paper—black absorbs heat. The black surface is where YOUR FOOD WILL BE SET TO COOK. How much you need will depend on the size of the pizza box you're using to make your solar oven.


5. To insulate your oven so it holds in more heat, ROLL UP sheets of newspaper and place them on the bottom of the box. Tape them down so that they form a border around the cooking area. It may be helpful to also TAPE THE ROLLS CLOSED first. The newspaper rolls should make it so that the lid can still close, but THERE IS A SEAL INSIDE OF THE BOX, so air cannot escape.


6. The best hours to set up your solar oven are when THE SUN IS HIGH OVERHEAD - from 11 am to 3 pm. Take it outside to a sunny spot and adjust the flap until the most sunlight possible is REFLECTING OFF THE ALUMINUM FOIL AND ONTO THE PLASTIC-COVERED WINDOW. USE A RULER TO PROP THE FLAP AT THE RIGHT ANGLE. You may want to ANGLE THE ENTIRE BOX by using a ROLLED UP TOWEL.


7. You can make toast by buttering a slice of bread then letting the sun do the rest. Cooking a hot dog or making NACHOS WITH CHIPS AND CHEESE are also fun treats to make in your solar oven! It would also work great to heat up leftovers. So the paper at the bottom doesn't get dirty, put what you would like to cook on a CLEAR PLASTIC OR GLASS PLATE. A pie plate would work well. Place the thermometer inside your oven before you close it, so you can check the temperature [??? Isn't it risky for fitting the whole thing].


8. To take food out of the oven, open up the lid of the pizza box, and using OVEN MITTS OR POTHOLDERS, lift the glass dish out of the oven.


What Happened:


The heat from the sun is trapped inside of your pizza box solar oven, and it starts getting very hot. Ovens like this one are called COLLECTOR BOXES, because they collect the sunlight inside. As it sits out in the sun, your oven eventually heats up enough to melt cheese, or cook a hot dog!


How does it happen? Rays of light are coming to the earth at an angle. The foil reflects the ray, and bounces it directly into the opening of the box. Once it has gone through the plastic wrap, it heats up the air that is trapped inside. The black paper absorbs the heat at the bottom of the oven, and the newspaper make sure that the heat stays where it is, instead of ESCAPING OUT the sides of the oven.


Your solar oven CAN REACH ABOUT 200° F on a sunny day and will take longer to heat things than a conventional oven. Although this method will take longer, it is very easy to use, and IT IS SAFE TO LEAVE ALONE while the energy from the sun cooks your food.


We made a cheese roll up by melting cheese on a CORN TORTILLA. It took about 45 minutes for our cheese to melt and the tortilla to become soft. The internal temperature of our pizza box solar oven was 125° F.


If you do not want to wait long to have a solar-cooked dish, try HEATING UP SOMETHING That HAS ALREADY BEEN COOKED, like LEFTOVERS, or a can of soup. Putting solid food in a glass dish and liquids in a heavy plastic zip lock bag works well. You can also PRE-HEAT YOUR OVEN BY SETTING IT IN DIRECT SUN FOR UP TO AN HOUR.


Other recipes you may want to try are making baked potatoes, rice with vegetables, CHOCOLATE FONDUE, S'MORES, and roasted apples with cinnamon and sugar.


Even on partly cloudy days there may be enough heat and light from the sun TO SLOW COOK a special dish. 


Here are a few tips for having success with your solar oven:


  1. Stir liquids (if you're cooking something like fondue, rice, or soup) every 10 minutes. You can rotate solid food every 10-15 minutes as well, so IT COOKS EVENLY.

  2. Reposition your solar oven when needed, so that IT FACES DIRECT SUNLIGHT. You SHOULD BE CHECKING periodically on your oven, TO MAKE SURE it is in the sun.

  3. Make sure that the foil-covered flap is reflecting light into the pizza box, through the plastic-covered window.

  4. To experiment further with solar cooking, make your own SOLAR PURIFIER with this science project!


For more ready-to-go science projects, see Solar & Alternative Energy Kits.


Source: https://www.homesciencetools.com/article/how-to-build-a-solar-oven-project/


https://youtu.be/xbwliZJiHe8 


HOW TO MAKE A SOLAR OVEN FROM AN OLD ANTENNA DISH


Solar ovens are very eco-friendly cooking methods and are used all over the world. People actually use this to cook dinner and things. So whether or not this is long-time or just for fun, solar ovens are very neat things to make.


Steps


1

Obtain an old satellite dish. Make sure it's in ok condition.


2

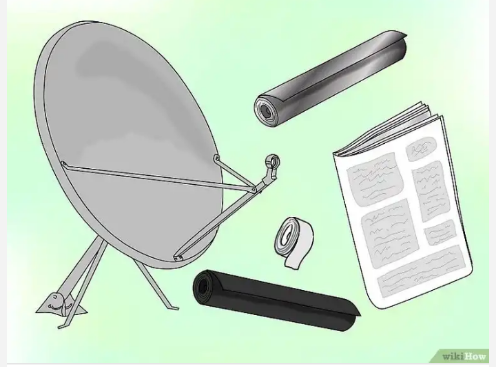
Gather your materials. You'll need the dish, aluminum foil, insulation (e.g. newspaper), black paper, a STAND, and some tape.


3

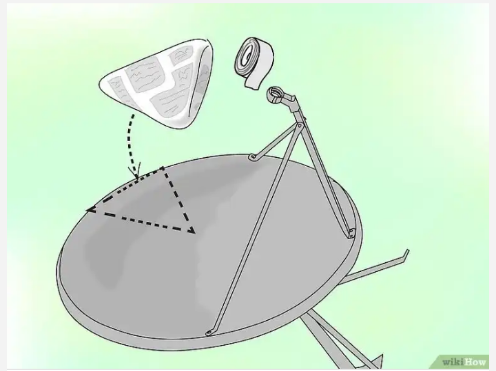
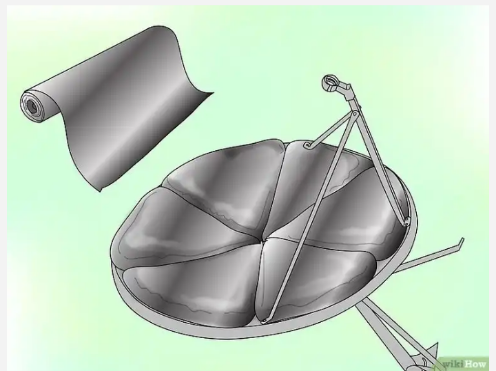
Lay the dish on the ground. Fold up your insulation so it's a triangle that's the shape of one of the ribs. Tape it together.


4

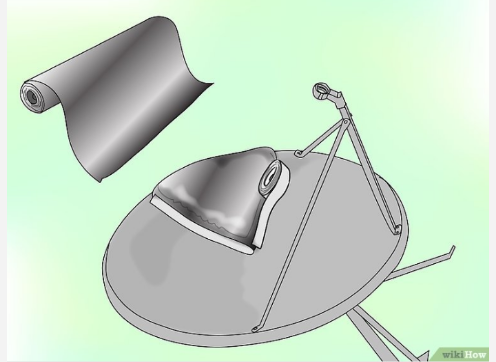
Now for the foil. Make sure it's flat! Otherwise it will not reflect AS WELL. Put it (shiny side up) on the insulation and Tape Or Glue it to the satellite.


5

Repeat the previous two steps until covered.


6

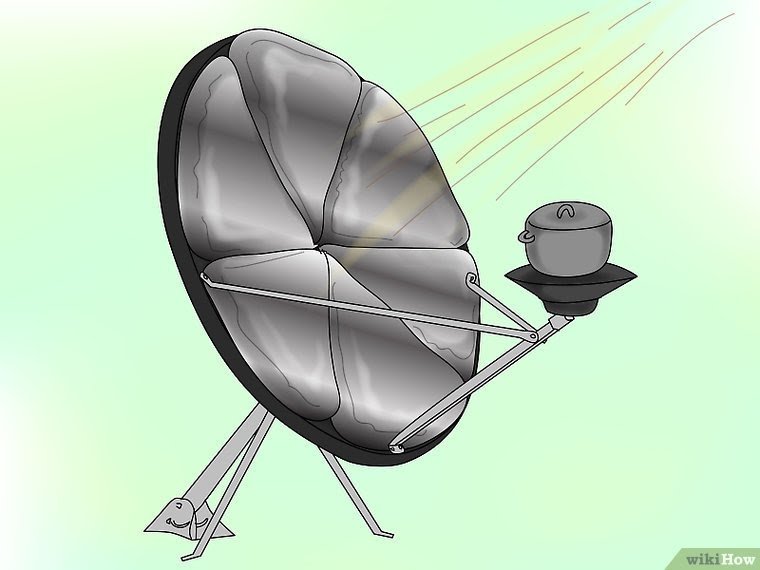
Now is the time for the paper. Tape the black paper to the outside of the dish. (This step is actually optional, so skip it if you don't want it.)


7

STAND IT ON THE STAND, directing to the sun. You now can cook all the food you want using the focus on the sun.


Source. (with pics): 

https://www.wikihow.com/Make-a-Solar-Oven--from-an-Old-Antenna-Dish?amp=1 


posted from Bloggeroid