Monday, May 25, 2020

A Map of Lexical Distances Between Europe's Languages


Lexical Distance Among the Languages of Europe: a hoax, a political pamphlet or actual popular science?

"It can only please a linguist to see a piece of  linguistic knowledge GOING VIRAL on social networks. When I first saw the image titled Lexical Distance Among the Languages of Europe below, I was not just happy - I thought: what an enormous amount of work must have been invested to produce this chart!

Lexical Distance Network Among the Major Languages of Europe

For a LAYMAN this may seem a simple thing to do: just compare the electronic dictionaries of the languages (ideally those using the same methodology in lexicography, to control for the effects from this area), and count the words that are identical. But it is impossible to compare electronic dictionaries of different languages because it often happens that a word that is pronounced the same in the two languages receives a different spelling in each of them (for instance the word группа 'group' in Russian is pronounced and means the same as the word група 'group' in Ukrainian, but since, for ARBITRARY non-linguistic reasons, they have a different spelling - they won't be recognized as identical). Moreover, it is often the case that between two closely related languages certain words occur with slightly different pronunciation, but with the same meaning and almost identical MORPHOLOGICAL forms (e.g. Russian раздел and Ukrainian роздiл, pronounced almost the same, DECLINED almost the same, and both meaning 'section'). A fair way to calculate the lexical distance would include a thorough ETYMOLOGICAL research (research into the history of words), a measure of phonological and morphological change since the common ancestor word (how much the pronunciation and the different forms of the words have changed), a correction factor for the shared or related complex words (since their parts are already counted in other words), especially in the cases where complex words share only certain parts, to mention just a few complex measures, most of which are unavoidably subject to approximation.

So upon seeing a chart like this a linguist is also immediately prompted to look for the methodology. Especially when some results seem UTTERLY SURPRISING. For instance, every SLAVICIST will be in disbelief seeing that Serbian is closer to Russian than Polish, Ukrainian or Belorussian. Even more so seeing that Croatian is as close to Slovak as to Slovenian, and Slovak is as close to Croatian as to Czech. And that Romanian is related to Albanian, but not to Serbian or to Russian, while Albanian is related to Slovenian, but not to Serbian. Some of these peculiarities receive a reasonable explanation from the aspect of political science: that Ukrainian is very different from Russian (Crimea, Donbass) and that Romanian is unaffected by it (Transnistria), that Croatian has different ties than Serbian, that Albanian is distant from and unaffected by Serbian (Kosovo)..."


Wednesday, May 20, 2020

Cheetah Sees Man Napping Under a Tree, Decides to Join Him

https://returntonow.net/2019/12/04/wildlife-photographer-takes-a-nap-cheetah-decides-to-join-him/

Wildlife photographer captures video of one of the deadliest cats in the world CUDDLING WITH him


After his dog died, Dolph Volker started spending all his spare time volunteering at an endangered wildlife sanctuary in South Africa.

After several days of WARMING UP TO THE CHEETAHS, he trusted them so much that he decided to lie down for a nap under a tree.

Amazingly, one of the cheetahs decided she trusted him so much she TIPTOED OVER and COZIED UP next to him.

Since their first ENCOUNTER, Volker and the female cheetah named Eden now regularly take naps together.


Eden usually NUZZLES her head right up on Volker’s chest and sometimes even wraps her arms and legs around him.


The pair have learned to like each other so much, Volker even allows her to GROOM him, LICKING HIS FACE and NIBBLING ON HIS EAR.

“True to Eden’s nature, SHE WARMED UP TO ME in days and ended up really liking me, so much so that I was able to trust her completely. The more she felt comfortable with me, the more she treated me just like another Cheetah which included the GROOMING, NIBBLING, BITING, PACIFYING, PURRING, laying on me, and sleeping… CUDDLING UP close to me. I’m amazed how much more interactive and AFFECTIONATE Cheetahs are compared to the average domesticated cat,” Volker writes for his YouTube channel.

See their amazing connection in the video below:
https://youtu.be/JlGfi2ofzFc

posted from Bloggeroid

Tuesday, May 19, 2020

What’s the Difference Between Roasting and Baking?


What’s the Difference Between Roasting and Baking?

While these cooking methods are nearly identical in today’s kitchen, there are actually a few things that set them apart.

  • Structure of the food: This is the primary factor that sets these cooking methods apart. Roasting involves cooking foods that already have a solid structure before the cooking process begins (think: meat and vegetables). Baking involves that foods that lack structure EARLY ON, then become solid and lose their “empty space” during the cooking (think: cakes and muffins).
  • Temperature: Various sources note that the temperature setting on the oven also distinguishes these two cooking method. Roasting requires a higher temperature (400°F and above) to create a browned, FLAVORFUL “crust” on the outside of the food being cooked, while baking occurs AT LOWER OVEN TEMPERATURES (up to 375°F).
  • Fat content: While many baked goods contain fat within, an OUTER COATING OF FAT, such as vegetables or meat brushed with olive oil, is an indicator of roasting.
  • Covered pan: Roasting is typically done in an open, uncovered pan, while items that are baked may be covered.

Which Method Is Right for Your Recipe?

If you’re cooking food that has a solid structure — like any type of meat or vegetables — no matter the temperature of the oven, you’ll roast it.

If you’re cooking food that doesn’t already have a solid structure, but will after it’s cooked — like muffins, cake, bread, and CASSEROLES — the proper method is baking.

Simple enough, right?


posted from Bloggeroid

The Time Travelling River, a children's book

https://drive.google.com/file/d/1BHq7kViHi1Wu6yghMAIL2NENhKIaYiX0/view?usp=drivesdk

Vocab:
history come alive,  roar, monsoon, shade, to damp, vanish, greedy, flood, dam,
rubbish bins, sewage pipes, and plastic dumps, 
meddle, barren, wasteland.

Monday, May 18, 2020

Classroom games for beginners, kids

Stories for Children

Short stories for kids

Children's Stories + audios

Free Kids Books 2

FREE STORIES FOR KIDS 6-9 years old

Baked Pumpkin - a tale by Elin Pelin

https://www.learn-bulgarian.net/blog/baked-pumpkin-a-tale-by-elin-pelin/

The following short story is written by one of the most famous Bulgarian authors – Elin Pelin. His stories are both touching and funny and his style is generally very amusing.

The original text of the story can be found here.
http://balgarin.bravehost.com/elinpelin/tikva.htm

Baked Pumpkin by Elin Pelin

When Goody Goodfellow, filing clerk in the local government, once went to the house of the director to bring some documents for signing he found him eating with his wife and children a pumpkin, baked whole into the oven.

FREE CHILDREN'S BOOKS

Thursday, May 14, 2020

Natural Building with Earthen Floors | Learn about the benefits of earthen floors and how to install them yourself.

https://www.motherearthnews.com/green-homes/natural-building/earthen-floors-ze0z1511zbay

Natural Building with Earthen Floors
Learn about the benefits of earthen floors and how to install them yourself.

By Sukita Reay Crimmel, James Thomson, and Frank Meyer
| November 2015


The Art of Natural Building (New Society Publishers, 2015), edited by Joseph F. Kennedy, Michael G. Smith, and Catherine Wanek, is a collection from over 50 leading voices in the field of natural building that describes dozens of eco-friendly building techniques, from straw bale and cob, to hemp and salvaged materials. The following excerpt is from Chapter 47, “Earthen Floors.”

You can purchase this book from the MOTHER EARTH NEWS store: The Art of Natural Building.

Earthen floors are a great option for those who want to bring earth into their homes. The technique is relatively easy to learn, and the floors can be installed in a variety of situations and conditions, including both new and existing buildings. They could sell themselves on aesthetic appeal alone, let alone their unique feel, low toxicity, thermal benefits and minimal environmental impact.

The concept of an earthen floor is not new. Homes have been built directly on the earth for millennia. In many parts of the world, people still live on floors made of earth. Most traditional earthen floors are just the raw earth, tamped down with human feet and moistened frequently with water to keep the dust down. Sometimes sealers are used to stabilize the earth more permanently.

Over the last few decades, earth builders in North America have been improving earthen floor installation techniques to the point where now even people living in conventional houses are willing, even enthusiastic, to live on a floor made out of earth. Today’s earthen floor practitioners carefully select, process and mix their raw materials and install them with the assistance of laser levels, steel trowels and insulation to make floors that are flat, smooth and warm. Oil and wax sealants provide durability, water-resistance and shine. Some earthen floors are installed in conjunction with radiant heat systems, a wonderful heating option for modern homes.

Earthen floors are remarkably versatile, but may not be suitable for every application. It’s useful to understand a few of their key characteristics to determine where they should and should not be installed.

Weight:  Earthen floors are heavy; they require a stable and strong subfloor. Most typically they are built “on grade” (i.e., directly on the ground), over a strong base pad made of concrete or compacted gravel (road base). They can also be built on raised wooden subfloors, even on second or third levels if the structure is strong enough to support the additional weight; consult with an engineer if in doubt. An advantage of heavy floors is that they are a good source of thermal mass, which helps moderate indoor temperature fluctuations.

Hardness: The surface of an earthen floor can look and even feel like concrete, but it does not have the same compressive strength. Earthen floors can be dented by point loads or scratched by heavy objects. Their hardness can be compared to that of a wood floor. Experience has shown that because they are softer, earthen floors are more comfortable to stand and walk on than concrete floors.

Water resistance: Sealing with the right kind of oil gives earthen floors a durable, waterproof finish. You can spill water on them and even mop them without any problem. But below the sealed surface, the floor is still unstabilized earth. Prolonged exposure to lots of water could have negative consequences, as the water seeps through cracks and pores into the layers beneath. Earthen floors have been successfully installed in bathrooms, but shouldn’t be used in showers or in basements that flood.

Thickness: Earthen floors are usually ¾–2 in. (2–5 cm) thick. It’s important to consider this added thickness when planning for transitions to adjacent rooms or entryways, or in rooms with already-low headroom.

 Installation time: Earthen floors are not a quick flooring solution. Drying and curing are the most time-consuming stages. Sometimes installers employ fans, heaters and dehumidifiers to speed up the drying process. Under the proper conditions, a floor could be completed and ready for use in two weeks, but three to four weeks is not uncommon.

Toxicity and flammability: More people are becoming concerned about toxic materials in building products, such as glues, polymers, preservatives and flame retardants. Earthen floors are a natural, non-toxic flooring option; the main ingredients come from the earth beneath our feet. The oils used for sealing, while extracted from natural ingredients, do contain some volatile organic compounds (VOCs). Once the VOCs have evaporated (this takes one to three days), they no longer pose any risk to the inhabitants, but any adjacent occupied rooms should be sealed off during the oiling and drying process. Earthen floors are naturally non-flammable, and are good options for areas around stoves and fireplaces.

Testing an Earthen Floor Mix

Many earthen floors are made from locally sourced and processed ingredients. The basic ingredients are sand, clay soil and a short natural plant fiber (chopped straw is a common choice). Sand is the main building block, giving the floor its strength. The fiber provides tensile strength to minimize cracking, and an aesthetic touch. The clay is the binder that sticks it all together. There is a lot of flexibility in the recipe for a floor mix, but good testing is critical to ensure a successful installation.

Start the testing process by making several batches of sand and clay soil mixed together in different ratios. Earthen floors are mostly sand. The final recipe will depend a lot on the amount of clay in the soil; if it is very clay-rich, you will need to add a lot of sand to compensate. Try starting with three test batches with different clay-to-sand ratios, say 2:1 (sand to clay), 3:1 and 4:1. For each test, carefully measure the ingredients into a bucket, mix them dry and then add water slowly until the mix reaches a thick but spreadable consistency like cake batter. Use a wooden float to spread the mixture on a stable surface. Each test patch should be about ¾ in. (2 cm) thick and at least 18 in. (45 cm) in diameter. Smooth it with a steel trowel and allow it to dry. Repeat this process for each of the other tests, carefully labeling the ratios of each.

When the test patches are dry, check them for cracks, dusting and durability. Cracks are caused by the shrinkage that naturally occurs when clay dries. If a test patch has a lot of cracking, the clay content is too high. If sand grains easily come loose when the surface is rubbed, this is an indicator of too little clay. Finally, the test patch should be resistant to scratching with a fingernail. You will be able to mark it, but it should not crumble away as it is scratched. A surface that is too fragile indicates low clay content.

Once you have determined a good sand-to-clay ratio, make new test mixes with fiber added. Try several tests with fiber content ranging from 10–20 percent of the volume of the clay/ sand mix. The “right” fiber concentration is mostly personal preference. Fiber in the floor will affect workability and aesthetics. More fiber makes the mix harder to spread and smooth out; too little could mean a weaker floor. Chopped straw is light in color and contrasts against the darker background of an earthen floor. The more fiber, the more this effect will be visible. Once a suitable recipe is determined, do a final round of testing that includes burnishing, oiling and waxing, to see what the finished floor will look like.

Mixing and Pouring the Floor

An earthen floor needs a stable, strong and level subfloor. Subfloors that settle or flex will eventually cause cracks in the finished floor. If it is a wood-framed subfloor, cover the wood with a vapor retarder to prevent damage from moisture during the installation process. Insulating under the subfloor is highly recommended to improve energy efficiency and occupant comfort. The insulation material must be strong enough to support the weight of the floor above without shifting or compacting over time. Typically, a high-compressive-strength rigid foam insulation is used. Unfortunately, there are few good natural options. Pumice rock has been used with some success. Straw or straw-clay combinations are not recommended.

Before beginning the pour, protect any surfaces in the room that could become damaged or dirty during installation. Set up fans and dehumidifiers for drying in advance. Determine how thick the floor will be and mark the walls with a line to indicate the finished height. There are various methods for ensuring a flat and level floor. A laser level is great tool if it is available and the installers are familiar with its use. Other options include screed rails and boards (a technique commonly used for concrete pads), or using a depth gauge (a simple stick with a mark on it) to measure the floor thickness as it is installed. Mixing the floor material is a messy process that is best performed outside. Organize all the materials in a central location and make sure they are processed and ready for use. Determine an appropriate measuring container (usually a five-gallon bucket) and translate the predetermined recipe for that measuring volume.

Mixing can be done by hand in a wheelbarrow or with a machine like a mortar mixer. For small floors, hand mixing works fine. Have two people with hoes stand at opposite ends of the wheelbarrow. Mix the sand and clay first, dry, then slowly add water to achieve a cake batter consistency. Then add the chopped straw, and more water if necessary. If using a mortar mixer, put water and clay in first, and then power up the mixer. Add the sand next, followed by the straw and more water if needed, then dump into a wheelbarrow for transport. For either method, add water slowly until you are confident about how much is needed to make an acceptable mix. It’s easy to make a dry mix wetter; drying out a toowet mix requires adding more dry ingredients in the correct proportions, which can be complicated.

Dump some wet mix onto the work area. Keep the piles of material to a manageable size, about enough to cover a 2 × 2 ft. (60 × 60 cm) area. Flatten the mix with a wooden float. Check frequently for uniform thickness and level. Use a back-and-forth sawing motion to remove small amounts of mix from high areas without making holes in the floor, or add more mix to low spots and blend it in with the flat part of the float. Once a section is flat and level, swipe a steel trowel lightly over the surface to make it smooth and glossy. It should only take a couple of passes. Do not overwork the material! Any irregularities up to 1/16-inch (1.5 mm) deep can be taken out in the burnishing step.

Burnishing, Oiling and Finishing

Burnishing is the process of polishing the still-damp floor with a steel trowel to further smooth and compress it. This step is not necessary, but it will improve the final appearance of the floor. Burnish within 24 to 48 hours after pouring. The floor should still be damp but not too soft; if it’s possible to make a trowel mark deeper than about an 1/8 in. (3 mm), the floor is still too wet and needs more time to dry. Once it reaches the necessary stiffness, carefully walk out to the far end of the floor, using foam pads or steel floor pans to spread your weight. Mist down a section with a spray bottle and smooth it out by applying pressure with a steel trowel. The surface should be shiny and smooth when done. If you find areas that are particularly low, you can add a little more wet mix to fill them out. This is your opportunity to make the floor perfect!

After the floor is completely dry, it can be sealed with a drying oil like linseed oil. Linseed oil is made from flax seeds, and there are many types and grades available. The recommended oils do not contain heavy-metal drying agents and come premixed with solvent to allow increased absorption. See under “Resources” for suppliers. If a premixed oil is not available, mix four parts linseed oil with one part solvent (mineral spirits, citrus oil or turpentine) to make your own oil blend.

Proper sealing with an appropriate oil is what gives an earthen floor its hardness and resistance to moisture. The oil is absorbed by the dry earth mix and polymerizes as it dries, binding the earth together and making a hard and water-resistant layer on top. Keep in mind that the unoiled floor is fragile — walk and work on it carefully! The oil can be applied with a brush, a paint roller or rags. Apply four to six coats of oil in the same day, one right after the other. Do not leave any puddled oil on the floor; clean it up with a clean rag. Make sure the room is well ventilated while applying the oil, and also while it cures, which can take a week or more.

Once the oil has cured, the floor is ready for use. At this point, there are some additional optional finishing steps that can make the floor even smoother and shinier. Many choose to apply a floor wax for added durability and shine. The recommended waxes are fairly liquid and can be applied with a brush or rag. After drying, the floor should be buffed with an electric buffer to remove excess wax. Another optional step is to lightly sand the floor after the oil has cured and before waxing. This leaves a smoother finish.

The earthen floors of today are a synthesis of ancient and traditional practices melded with modern materials and building science. Until recently, the only way to have an earthen floor was to make it yourself. Now, in some parts of the country, there are contractors who offer the technique, and a ready-mix floor product is available to take out some of the guess work for the novice builder. More people are finding that earthen finishes are not merely appropriate for our modern lifestyles, but are in fact a highly desirable choice. They offer all of us the opportunity to experience the joy of living with earth in our homes.

Sukita Reay Crimmel has installed over 20,000 square feet of earthen flooring, and is one of the preeminent experts in the emerging field of earthen floors. She has created a ready-mix flooring product and a line of finishing oils, manufactured under the name Claylin.

James Thomson has spent a decade introducing students to the joys of building with earth with House Alive, one of the leading natural building training organizations in North America. He is an accomplished public speaker and event planner, having facilitated several professional conferences for natural builders.  


A Tamped Road-Base Floor

By Frank Meyer

I made my first earthen floor over 20 years ago. I started the process by collecting samples of all the soil types available in our area. After weeks of playing in the dirt, mixing in stabilizers and trying to strengthen and harden the earth to make it suitable for a floor, I came to an interesting conclusion. One particular road base made the hardest, prettiest and quickest floor without any stabilizers at all. Its rich red color and excellent blend of silt, clay, sand and gravel made test bricks that were more impressive than anything else I came up with.

Not all road bases are created equal. The one I chose is what is known here as “city base,” and is approved for building roads and streets in Austin, Texas. It originates in a quarry where the material is taken from the earth and the silt, clay, sand and gravel are separated, then re-blended to specified proportions. By using this material and applying basic road building techniques, we have a big advantage over traditional poured-earth floors. The process uses relatively little water, thereby requiring a much shorter drying time. It can typically be walked on a day or two after installing.

To begin the process of building a tamped road-base floor, make sure the ground is fairly level, smooth and compacted to at least 6 in. (15 cm) below the planned finished floor height. If a vapor barrier is used, spread a layer of sand 1–2 in. (2.5–5 cm) thick both below and above the barrier to prevent gravel from puncturing it. Apply the first layer of road base to a thickness of about two inches and wet it with a hose or watering can, just enough so that the silt and clay stick to the aggregate.

Compact the first layer. A plate compactor, available at tool rental outlets, works well. (Be sure to vent the building with fans if using a gas-powered compactor.) Hand tamping is slower but much quieter and doesn’t produce fumes. Hand tampers are easily made from wood or concrete or by welding a steel plate to a piece of pipe. Hand tamping the edges works best, even if a powered compactor is used.

Repeat layers as necessary until they reach about 1 in. (2.5 cm) from the finish height. At this point, you need to level the floor. Sift the road base through a piece of 3/8 in. (1 cm) hardware cloth to produce a mixture of silt, clay, sand and small gravel. Layer it on and level it out, using screed boards (much like concrete workers use).

After leveling, moisten and tamp the mix again, making sure that it bonds with the layer below. For the top coat, we screen the material again, this time using 1/8 in. (3 mm) hardware cloth. The top coat is not compacted but hand troweled and burnished, using just enough water to make it bond and be workable. The most important thing is to make sure it bonds with the layer below. Trial and error will give you a feel for it. Although many of the floors I have done have no straw in them, adding chopped straw lessens the likelihood of cracking. Getting a smooth, slick finish is more difficult with straw in the top coat, so I recommend chopping the straw very finely if a glassy finished is desired.

Traditionally earthen floors were sealed with fresh blood from a cow or ox, but most builders today use boiled linseed oil or tung oil to seal the floor so it will not dust up, and it can even be cleaned with a damp mop. The floor must be thoroughly dry before sealing or the finish may turn cloudy, or even moldy in a moist location. I like to put no less than six coats of oil on, making sure each coat is totally dry before adding another coat. There are now many commercial products available for sealing that may even dry harder than linseed oil, but they are more expensive. Consider using them only for the final coat. With time, patience, lots of hard work and an affinity for getting dirty, anyone can do this. Enjoy!

Frank Meyer of Thangmaker Construction has over 45 years of construction experience. His focus is sustainable and green building. He specializes in straw bale construction and earthen floors and is available for consultation and workshop facilitation.


Reprinted with permission from The Art of Natural Building, edited by Joseph F. Kennedy, Michael G. Smith, and Catherine Wanek, and published by New Society Publishers, 2015. You can purchase this book from the MOTHER EARTH NEWS store: The Art of Natural Building.

Tuesday, May 12, 2020

Give Peace A Chance by John Lennon


"Give Peace a Chance" is an anti-war song written by John Lennon (credited to Lennon–McCartney), and performed with Yoko Ono in Montreal, Quebec,
Canada.[2] Released as a single in July 1969 by the Plastic Ono Band on Apple Records (catalogue Apple 13 in the United Kingdom, Apple 1809 in the United States), it is the first solo single issued by Lennon, released when he was still a member of the Beatles, and became an anthem of the American anti-war movement during the 1970s. It peaked at number 14 on the Billboard Hot 100 and number 2 on the British singles chart.**"Give Peace a Chance"**📷Single by [Plastic Ono BandB-side](https://en.m.wikipedia.org/wiki/A-side_and_B-side)"Remember Love" (Yoko Ono)Released4 July 1969 (UK)

WRITING AND RECORDINGEDIT

📷Recording "Give Peace a Chance" at the Queen Elizabeth Hotel, Montreal, on 1 June, 1969. ... The song was written during Lennon and Ono's "Bed-In" honeymoon in Montreal, Quebec, Canada.[3] When asked by a reporter what he was trying to achieve by staying in bed, Lennon answered spontaneously "Just give peace a chance". He went on to say this several times during the Bed-In.[3] Lennon asked his press officer, Derek Taylor to find a recording engineer. On 1 June 1969, in Room 1742 at the Queen Elizabeth Hotel in Montreal, André Perry, owner of a local recording studio in Montreal, arrived and used a simple setup of four microphones and a four-track tape recorder he brought with him.[[4][5]](https://en.m.wikipedia.org/wiki/Give_Peace_a_Chance#cite_note-5) The recording session was attended by dozens of journalists and various celebrities, including Timothy Leary, Rabbi Abraham Feinberg, Joseph Schwartz, Rosemary Woodruff Leary, Petula Clark, Dick Gregory, Allen Ginsberg, Roger Scott, Murray the K and Derek Taylor, many of whom are mentioned in the lyrics. Lennon played acoustic guitar and was joined by Tommy Smothers of the Smothers Brothers, also on acoustic guitar. Some years later, André Perry recalled the occasion, and spoke about the challenges of getting a good sound out of the recording. Because of the room's poor acoustics, he said, the raw recording could not have been released without help:"
Source: Wikipedia
LYRICS:
Two, one-two-three-four!
Ev'rybody's talking 'bout
Bagism, Shagism, Dragism, Madism, Ragism, Tagism
This-ism, that-ism, is-m, is-m, is-m
All we are saying is give peace a chance
Hit it
C'mon, ev'rybody's talking about
Ministers, sinisters, banisters and canisters
Bishops and Fishops and Rabbis and Popeyes and bye-bye, bye-byes
All we are saying is give peace a chance
Let me tell you now
Ev'rybody's talking 'bout
Revolution, evolution, masturbation, flagellation, regulation, integrations
Meditations, United Nations, congratulations
All we are saying is give peace a chance
Ev'rybody's talking 'bout
John and Yoko, Timmy Leary, Rosemary,…
Източник: LyricFind


Saturday, May 9, 2020

EngVid: Writing a "Personal Statement"

https://www.facebook.com/227608180331/posts/10162680896650332/?sfnsn=mo&d=n&vh=e

Are you applying to university or college? You may need to write a "Personal Statement" to tell the school more about yourself. Watch Adam's new video to learn what makes a good personal statement and how to write it!

posted from Bloggeroid

Friday, May 8, 2020

7 easy English idioms for giving advise

Welcome to the Pages of the Interslavic Language

http://steen.free.fr/interslavic/index.html

VOCAB:
coherent
simultaneously
generic
for all slavs alike
territory
naturalistic
come into being
blended together  
merged 
elaborate 
primers
bystanders
fora
rural
from scratch
consist entirely of
know how to 
except for
transliterator

Interslavic is a language used by Slavs of  different nationalities for communication among themselves. This is made possible by the fact that the Slavic languages are a relatively COHERENT family: knowing one of them is usually sufficient to get a rough idea of what a text in any other Slavic language is about. Throughout the centuries, Slavs have learned to talk to their neighbours by means of simple, improvised language forms.

Saturday, May 2, 2020

Mastering Descriptive Language: How to Create Powerful Content


MARCH 11, 2020
Carrie Dagenhard
Blogging,How To,Tips

If you’ve ever stayed awake until 2 a.m. to finish an ENTHRALLING book, or purchased a product immediately after reading a compelling TESTIMONIAL, then you understand the power of descriptive language.

Contrary to popular belief, it takes more than a good story to KEEP PEOPLE HOOKED ON YOUR CONTENT. If you want to capture and hold a reader’s attention, you have to activate their imagination. By VIVIDLY describing people, places, and events, you can help your readers participate in the experience. This establishes an emotional connection, makes content more memorable, and keeps audiences coming back for more.

Here are three descriptive writing tips to help make your blog posts as compelling as possible.

1. Focus on the human experience

Whether you’re a traveler RECOUNTING your latest adventures or a business owner marketing a product, all bloggers are writing for other humans. Like you, your writers experience challenges and opportunities, moments of frustration, and BOUTS OF UNBRIDLED JOY.

“Prose is a window onto the world,” says Harvard Linguist Steven Pinker, according to an article in Inc. “Let your readers see what you are seeing by using visual, concrete language.”

But instead of simply listing the sights from your last trip or various features of your product, DELVE INTO the human experience and place those feelings AT THE EPICENTER of your story. For example, imagine you run a local HOUSEKEEPING service, and you’re composing a blog post about tasks people can OUTSOURCE to simplify their lives. One of these suggestions is, of course, hiring a trusted housekeeper.

Here’s an example of how you’d use descriptive language in this scenario:

After ENDURING a long, GRUELING day of work and BUMPER-TO-BUMPER afternoon traffic, you finally pull into your DRIVEWAY. Exhausted, you begin imagining all the ways you’ll UNWIND: a hot bath, a glass of wine, and an evening spent BINGEING your favorite Netflix series. Unfortunately, the moment you open your door, you’re greeted by MOUNDS OF LAUNDRY, STACKS OF DIRTY DISHES, and carpet OBSCURED by a thick layer of pet hair. There’s no way you’ll have time to relax.

Luckily, there’s a solution.


2. Use sensory words

Sensory language isn’t just for poets and novelists. Along with adding aesthetically pleasing images in your blog posts, INVOKING readers’ senses via the written word is one of the best ways to captivate and maintain your readers’ attention. It also helps them feel like they’re actively experiencing what they’re reading.

Here are several examples of sensory words for each of the five senses:

Sight: Dark, DINGY, GLOOMY, bright, DAZZLING, SHIMMERING, TWINKLING
Touch: Smooth, SCRATCHY, FRIGID, SCALDING, FUZZY, rocky, SLICK

SoundSCREECHING, BUZZING, CHIRPING, CLINKING, GROWLING, JANGLING, THUMPING

Taste: Bitter, sweet, buttery, ZESTY, spicy, TART, CRISPY

SmellMUSTY, FOUL, floral, PINEY, smokey, ACRID


3. Include ANECDOTES, SIMILES, and metaphors

One of the best ways to help readers understand and remember crucial points in your content is to use an anecdote, a simile, or a metaphor.

An anecdote is a short and entertaining narrative about a real incident. The story can be inspirational, humorous, cautionary, or philosophical — but most importantly, it should be useful and relevant. For example, a fashion blogger sharing rainy day ATTIRE might provide an anecdote about a time she forgot her RAINCOAT, got caught in a DOWNPOUR, and ruined her favorite silk blouse.

A simile compares two things, typically using the words “like” or “as.” For example, “It’s as dry as a desert.” And a metaphor refers to something as something else, usually for clarification or EXAGGERATION. For example, “The baby’s laughter was music to her parents’ ears.” These language tricks are more likely to get your readers’ attention and engage them in the story you are trying to tell.

Although it may take a little extra time to CRAFT content with descriptive language, the increased engagement will be well worth your effort.
---

Carrie Dagenhard

Carrie is an old school, GUMSHOE journalist TRAPPED IN a modern content marketer's body. She specializes in writing for the marketing, technology and healthcare industries, and loves helping bloggers and small business owners grow their presence online. Carrie RESIDES in the "Silicon Hills" of Austin, TX with her husband and two adorable cats.


VOCAB:
https://www.hangmanwords.com/play/custom-ZW50aHJhbGxpbmclMEF0ZXN0aW1vbmlhbCUwQWtlZXAlMjBwZW9wbGUlMjBob29rZWQlMjBvbiUyMHlvdXIlMjBjb250ZW50JTBBdml2aWRseSUwQXJlY291bnRpbmclMEFib3V0cyUyMG9mJTIwdW5icmlkbGVkJTIwam95JTBBZGVsdmUlMjBpbnRvJTBBYXQlMjB0aGUlMjBlcGljZW50ZXIlMEFob3VzZWtlZXBpbmclMEFvdXRzb3VyY2UlMEFlbmR1cmluZyUwQWdydWVsaW5nJTBBYnVtcGVyLXRvLWJ1bXBlciUwQWRyaXZld2F5JTBBdW53aW5kJTBBYmluZ2VpbmclMEFtb3VuZHMlMjBvZiUyMGxhdW5kcnklMEFzdGFja3MlMjBvZiUyMGRpcnR5JTIwZGlzaGVzJTBBb2JzY3VyZWQlMEFpbnZva2luZyUwQWRpbmd5JTBBZ2xvb215JTBBZGF6emxpbmclMEFzaGltbWVyaW5nJTBBdHdpbmtsaW5nJTBBc2NyYXRjaHklMEFmcmlnaWQlMEFzY2FsZGluZyUwQWZ1enp5JTBBc2xpY2slMEFzY3JlZWNoaW5nJTBBYnV6emluZyUwQWNoaXJwaW5nJTBBY2xpbmtpbmclMEFncm93bGluZyUwQWphbmdsaW5nJTBBdGh1bXBpbmclMEF6ZXN0eSUwQXRhcnQlMEFjcmlzcHklMEFtdXN0eSUwQWZvdWwlMEFwaW5leSUwQWFjcmlkJTBBYW5lY2RvdGUlMEFzaW1pbGUlMEFhdHRpcmUlMEFyYWluY29hdCUwQWRvd25wb3VyJTBBZXhhZ2dlcmF0aW9uJTBBY3JhZnQlMEFndW1zaG9lJTBBdHJhcHBlZCUyMGluJTBBcmVzaWRl


SELF-CHECK:

True (T) or false (F):

This article is aimed at professional writers, particularly content writers/copywriters .

A good story is enough to  keep people hooked on your content.

Vividly describing people, places, and events makes readers participate in the experience, establishes an emotional connection, makes content more memorable, and keeps audiences coming back for more.

"Prose is a window onto the world,” so you should use more genersl and vague language.

Delve into the human experience and make these feelings central for your story.

Sensory language only works in poems and novels.

Jokes,, similes, and metaphors help your readers understand and remember crucial points of your content.

---


enthralling
testimonial
keep people hooked on your content
vividly
recounting
bouts of unbridled joy
delve into
at the epicenter
housekeeping
outsource
enduring
grueling
bumper-to-bumper
driveway
unwind
bingeing
mounds of laundry
stacks of dirty dishes
obscured
invoking
dingy
gloomy
dazzling
shimmering
twinkling
scratchy
frigid
scalding
fuzzy
slick
screeching
buzzing
chirping
clinking
growling
jangling
thumping
zesty
tart
crispy
musty
foul
piney
acrid
anecdote
simile
attire
raincoat
downpour
exaggeration
craft
gumshoe
trapped in
reside


posted from Bloggeroid

The Aboriginal Toda Architects of the Blue Mountains, India


1

INDIGENOUS people around the world are known to lead PRISTINE LIFESTYLES, united with nature. Their traditions DEEPLY RESPECT their habitat and many of their practices help to Conserve Biodiversity and Natural resources. HEREDITARILY, they are aware of the ill-effects their children will face, if they take a step against natural laws. Their customary designs and techniques of building shelters were also made consciously with local materials that are CLIMATE-RESISTANT. Let us look at one such tribe of Tamilnadu, India.

Toda is a PASTORAL aboriginal hill tribe of the Nilgris of Tamilnadu. They are among one of the oldest tribes of India, with each tribe known to have owned hundreds of buffaloes, that were the fundamental part of their lives. All their land, resources, and their buffaloes belonged to nobody and everybody. The Todas were the best living examples of COMMUNITY SELF-SUSTENANCE

Among the five Thinais of Landscapes, (Sangam Landscapes) Nilgiris or the Blue Mountains classifies under the Kurinji land. This Kurinji land of Nilgiris is characterized by the mountains of the Western Ghats they are situated among. Unusual to the tropical WARM-HUMID CLIMATE of Tamilnadu, Nilgiris is a perfect example of a unique South Indian Cold Climate, that is all through the year surrounded by the cold and frost. Here, the rainy seasons of June to September are accompanied by high Winds along with high humidity.

The Todas were KEEN WORSHIPPERS OF NATURE, religiously worshipping the five elements. As a clan, the Todas were strictly vegetarian, they never hunt or WAGE WARS. Their STAPLE FOOD depended on both forest produce as well as cultivation. They cultivated a wide-range of CLIMATE-RESILIENT MILLETS like Foxtail millet, little millet, Ragi, Pearl millet, local vegetables, varieties of mountain rice, gathered spices, honey, and fruits. Their traditional clothing is a single piece of cloth that they wrap around their body. The Toda Women EMBROIDER their own CLOAKS with VIBRANT RED AND BLUE MOTIFS. In a place where even their language is unique, it is also inevitable that their buildings are distinct too. The Todas built their own structures together as a community from LOCALLY SOURCED MATERIALS.

2

Natural Buildings of the Todas

The Todas are spread around the mountains as different HAMLETS with each hamlet having RESIDENCES, TEMPLES, AND BUFFALO PENS. Such a Toda settlement is called a Mund. We visited one such settlement called Thalakundha, where the ancient tower temple of “Muthanadu Mund” stands.

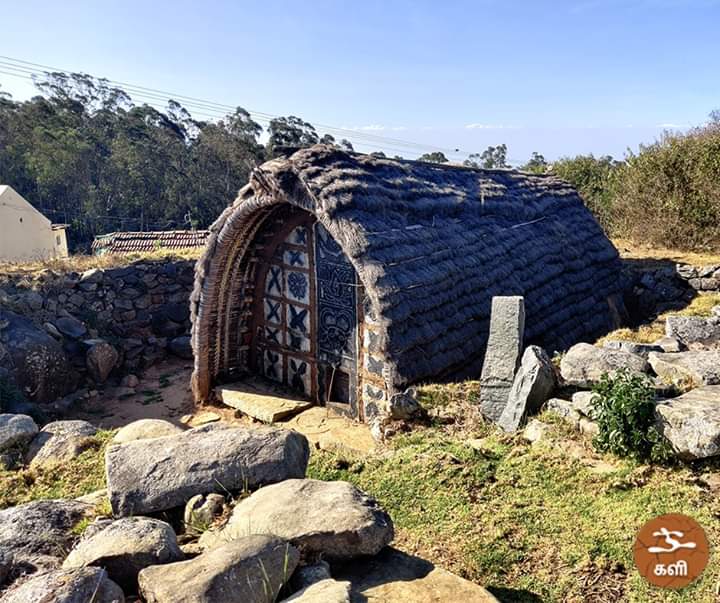
They build mainly two forms of structures –1. Arch buildings - called Moonbo and 2. Conical Temples(Gopura) - called Pozhvoash. The Arch building dominantly acts as a residential unit, but exceptionally in a few places, you can find arched temples. Conical structures are exclusively sacred temples. Till today, the Toda temples remain UNALTERED.

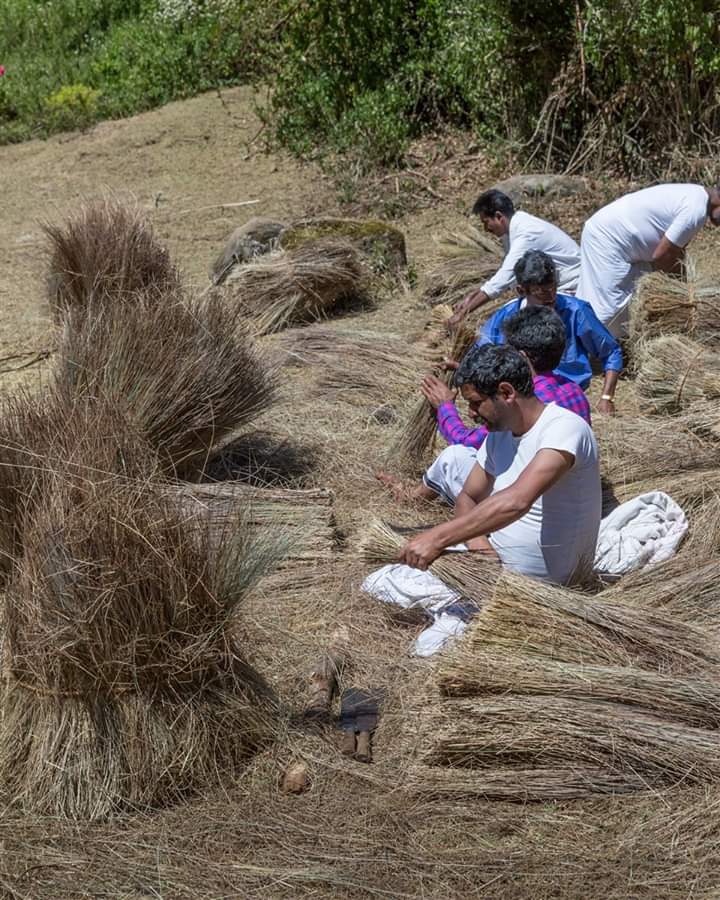
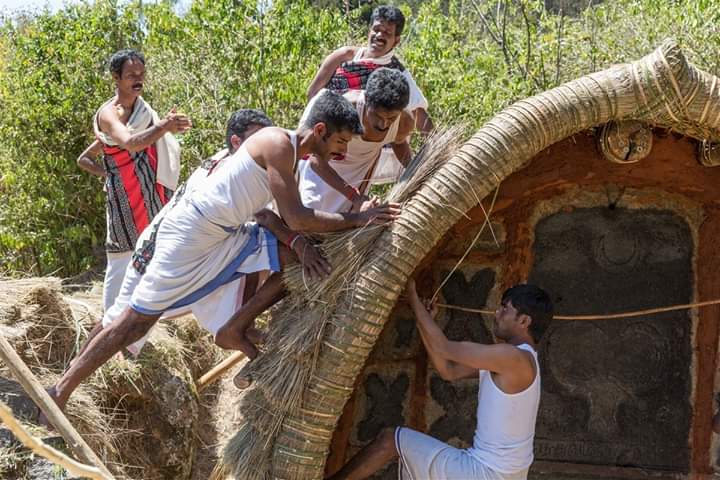
The natural buildings of the Toda are very minimal, hand-crafted, and CLIMATE-RESPONSIVE. Their main sources of building materials were wood, stones, bamboo, CANES, RATTAN, Thatch reeds, mud, and BUFFALO DUNG. All these materials were WITHIN THEIR REACH and everybody in the community still possesses the manual skills to construct a new one.

The arch structures are about 18ft [5.49 m] long by 9ft [2.74 m] wide and 10ft [3.95 m] tall in dimension. The front and the rear are covered with large pieces of stones with only a small door. Originally, this was done with wood, however, that practice has now become OBSOLETE.

The structure on top of these stones is a BARREL-VAULT, constructed with bamboos and canes that are LASHED WITH RATTAN. Bamboo REEDS are bundled to give HIGH TENSILE STRENGTH that holds the whole structure together. Finally, the area is covered with thick dried thatch called the Avful, a type of Tussock Grass.

In this house, they have 3 areas separate for different activities of cooking/fireplace, eating, and sleeping. They have a small storage space as well as a different space for POUNDING GRAINS. The toda houses had a raised sitting platform (Thinnai) outside for socializing.

3

All the structures of the Toda Settlement face their entrance North-East to receive the most morning sun. The half Barrel shape naturally acts stable against the high wind flow.

The structure has a small opening at the bottom of the barrel about 3ft by 3ft [0.91 m] in which a person has to BEND LOW to enter. In the kurinji land, there were always threats of wild animals including elephants, tigers, bears, and monkeys. This way of scarce openings was essential to keep themselves protected from wild animals. The fireplace inside is used to heat the interiors. The openings, stone, and thatch would not let the smoke escape out easily, keeping them warm at all times. The small openings also ensured individual privacy from outside.
Apart from this method of construction, WATTLE AND DAUB TECHNIQUES are also common here. Building walls with STONE AND CLAY AND POLES have been habitual.

The Todas have very ancient meaningful MOTIFS AND MURALS. All over the walls of the Toda temple, symbols are drawn to indicate the sacred buffalo and the cosmic circle. Each of their motifs drawn on their structures have meanings related to Nature and the daily cycle of life.

Today due to many interventions and changes, the Toda settlements are completely converted to concrete and tile roof houses. At present, about 1500 todas remain with SCARCE FEW*  ["a scarce of a very few" in the article sends to be wrong] buffaloes. The todas have become a part of the local people of Ooty and taken to modern life. They gather annually during their ceremonies or in OCCURRENCES of family functions and CHERISH THEIR CULTURE and practices.

*https://ludwig.guru/s/scarce+few


VOCAB:
1
pristine lifestyle
hereditarily
climate-resistant
pastoral
ucommunity self-sustenance
warm-humid climate
keen worshippers of nature
to wage wars
staple food
climate-resilient millet
cloaks
vibrant red and blue motifs
locally sourced material
  

2
hamlet
residence
temple
buffalo pen
unaltered
climat-responsive
canes
within their reach
obsolete
barrel-vault
lashed with rattan
Bamboo reeds
high tensile strength
pounding grains 


3
bend low
wattle and daub technique
stone and clay and poles
motifs and murals
scarce few
occurrence
cherish


6WORSHIPPERS OF NATURE OF NATURE from Bloggeroid